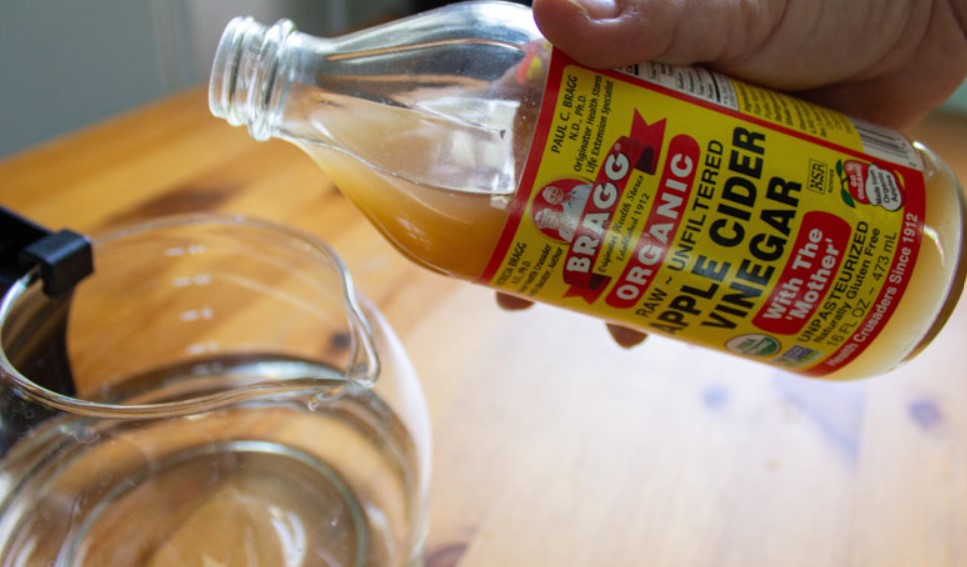
Start by juicing your citrus. Set aside the juice to freeze and use later. Cut the peels up into smaller chunks. Add the citrus peels to your quart-sized jar until it’s about halfway full. You can also add some dried rosemary if you wish.
Heat the vinegar, either on the stove in a saucepan, or in a bowl in the microwave. When your vinegar is hot, pour it over the citrus peels in the jar. Place your lid on your jar, and let the jar sit for 24 hours.
After the 24 hours, strain the vinegar and pour into a small spray bottle. You can clean just about anything and will also keep your home fresh with a citrus scent! – Via kitchenfunwithmy3sons.com
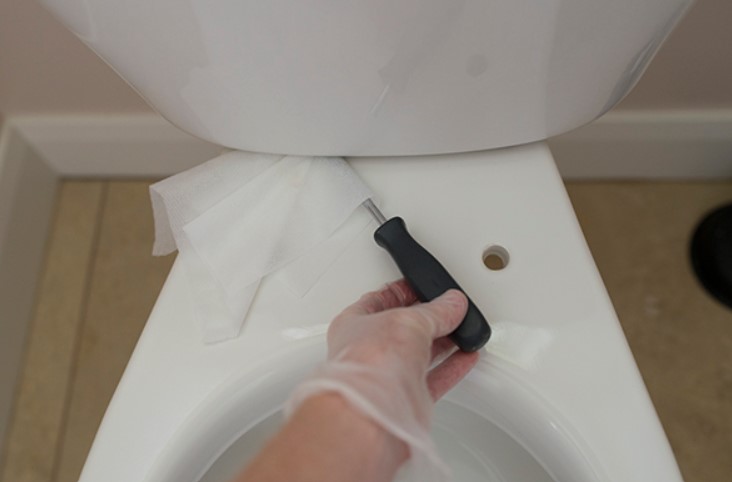
Before attempting to remove the toilet stains, clean your toilet. I clean my toilets with vinegar and baking soda, but you can use a store-bought cleaner if you prefer.
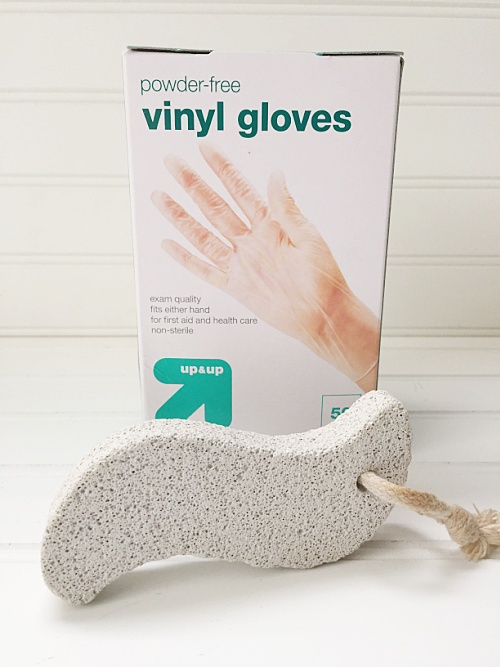
With the toilet cleaned, grab a pair of gloves and a pumice stone.
With gloves on, wet down your pumice stone by running it under a faucet; or simply dip it in the toilet bowl water. It is important to only work with a wet pumice stone to avoid scratching the porcelain.
Once the pumice stone is wet, started scrubbing the toilet stains. – via lemonslavendarandlaundry.com

Add 2 cups of water to a mixing bowl with a pour spout. Next, add 1/2 cup of baking soda. Then add 1 cup of vinegar and lastly, 1/2 a cup of dishwashing liquid and stir. Pour the mixture into a large empty spray bottle and spray the shower down. Scrub away! – via www.instagram.com/ocean_keys/
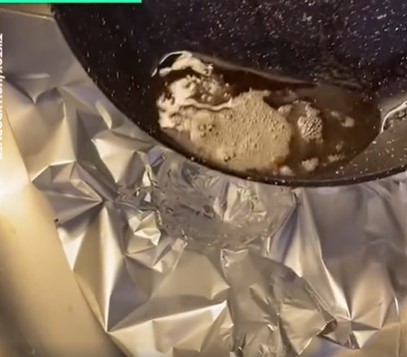
Leftover grease hack: Grab a piece of aluminum foil, place it on top of your sink drain and gently push the middle down so that you create a small well (make sure you haven’t punctured the foil). Pour the grease into the well, let sit long enough for the grease to solidify. Gather up the sides, mash together and toss in the trash. -via Instagram.com/Arron_crascall

Chemical-free air freshener: Just place a few drops of essential oil on a new air filter, install and enjoy! – via kidsactivities.com
Let your toilet bowl brush drip dry after each use by closing the seat on the handle. No more nasty water in the toilet brush holder! – via onecrazyhouse.com


Who knew using a dryer sheet could get rid of soap scum on a shower door? The fabric softener in the dryer sheet helps to loosen and dissolve the soap scum, making it easier to wipe away. It’s pretty genius.
Wet the dryer sheet and use it to scrub the soap scum on your shower door. You may need to apply a bit of pressure and scrub for a few minutes to remove all of the buildup. When you’re finished, rinse the shower door thoroughly with water and wipe it dry with a clean cloth. If the door has stubborn or heavy scum buildup, you may need a commercial cleaning spray to loosen it. – via thekrazycouponlady.com

Clean your kids’ bath toys with vinegar and warm water to keep germs at bay. – via onecrazyhouse.com
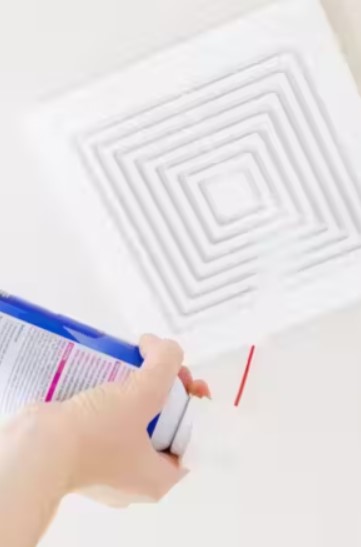
Spray a dusty exhaust fan with canned air. – via thekrazycouponlady.com
25 Uses for Dryer Sheets
1. Shine up chrome. Dampen a used dryer sheet and shine up the bathroom faucet or toaster.
2. Keep your scissors sharp by wiping the blades with a used sheet between uses.
3. Buh-bye pet hair! Rub a dryer sheet over your sofa, bed, etc and it’ll gather up all that hair from your fur baby.
4. Clean oven racks. Soak them overnight in some Dawn dishwashing liquid with some dryer sheets thrown in. The dirt and grime will wipe off easy the next day.
5. Put them in your drawers and they’ll make your clothes smell fresh and clean for a long time.
6. Ward off gnats and mosquitoes. Put a fresh sheet in your pocket and leave a little sticking out. Those flying little monsters don’t like the smell. Same with Mice!
7. A used dryer sheet is the best dusting cloth ever. Shelves, floors, lamps, you name it.
8. Dirty pots and pans are no match for a dryer sheet. Soak your pan in water, dishwashing soap, and a dryer sheet for about an hour.
That burned on goo that was stuck before will come right off.
9. One of the great uses for dryer sheets is the smelly shoes solution. Cut a fresh sheet in half and put one half in each shoe.
10. Clean paint brushes. Soak the in warm water with a dryer sheet for a couple hours.
11. Banish soap scum on shower doors. One of the uses for dryer sheets most people don’t know is how to use them to clean shower doors. Just wet a fresh sheet and scrub. They’re amazing.
12. Flyaway hair can be tamed by rubbing a used dryer sheet on your hair.
13. Discourage dust from accumulating on your TV by wiping it down with a used sheet.
14. Instantly make your car smell better by placing a fresh dryer sheet under a seat.
15. Got deodorant streaks on your shirt? Rub it off with a dryer sheet!
16. Get rid of toilet bowl rings by scrubbing with used dryer sheets.
17. Pop a dryer sheet inside your folded sheets to make sure they have that “just washed” fresh smell when you make a bed.
18. Keep a dryer sheet in your stored luggage. It won’t smell musty when you need to use it.
19. Hide dryer sheets around your house to make everything smell fresh and clean.
You can put them under sofa cushions, in baskets, anywhere you can find a hiding place.
20. Wipe your blinds down with dryer sheets once a month. It’ll help repel dust accumulation.
21. Dust and clean baseboards by rubbing them with a used dryer sheet.
22. Used dryer sheets packed in empty toilet paper rolls make great fire starters.
23. Clean hairbrushes by soaking them in warm water with a dryer sheet. Fresh and clean!
24. Send one with your kiddo to place in their school locker. It’ll smell so much better!
25. Make your own Swiffer pads. All you need is a few dryer sheets and you’re good to go.
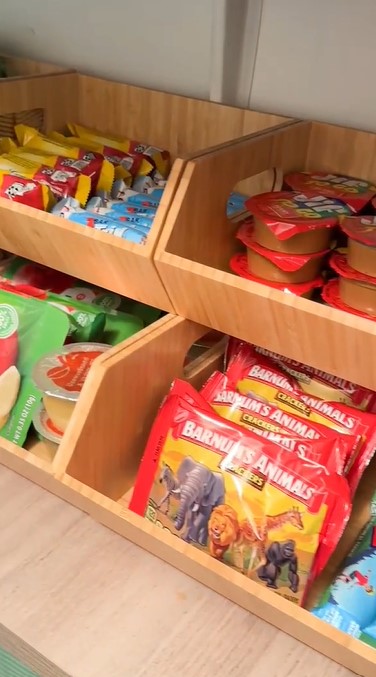
Create a Summer snack station for kids so they’re not asking for snack ideas or digging through and trashing the pantry. – via instagram.com/practical_perfection/
Organize all your drawers and cabinets with small drawer organizing trays and bins . Make sure you measure first and find ones that fit well. -via julieblanner.com

If you have some problematic hinges on any doors, or cupboard doors, you don’t need to purchase any fancy oil that will cost you almost the same price as a repairman coming to fix it. Instead, simply use olive oil! – via futurelad.com

Organize Your T-Shirt Drawer (the “File Folders” Way) – Visuals Shown Below Instructions
1.Lay your t-shirt face-down on a flat surface. Smooth out any wrinkles.
2. Fold one side of the shirt vertically into the middle. Turn the sleeve back.
3. Fold the other side the same way, into the middle. Continue to smooth out wrinkles as you go.
4. Next, take the bottom and fold it about 2/3 of the way up.
5. Fold the top down. Fold the t-shirt over itself one more time to create a nice rectangular shape.
6. Flip it right side up. See how the graphic is facing out? This helps you easily identify the shirt.
7. Place it in the bin, facing the front. Continue with the rest of your shirts. You can also use this storage method for jeans, sweaters, etc.

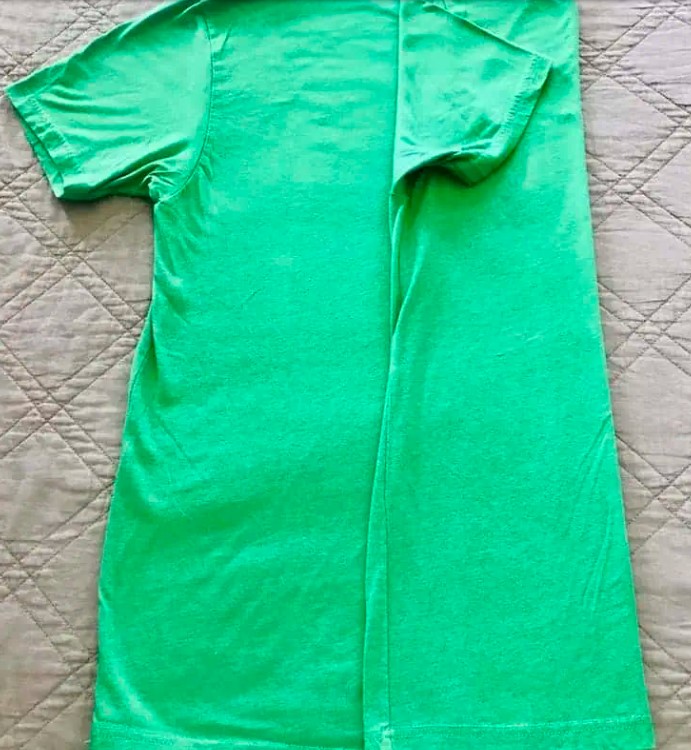


– via organizenvy.com
Hang Sweaters Correctly (Without Stretching Them)

1. Fold the sweater in half vertically. Carefully line up the sleeves and body and smooth out any wrinkles.
2. Place a hanger upside down on top of the sweater. The hook should lie in the upside-down “V” between the sleeves and body.
3. Fold the sleeves over the top hanger bar and under the second.
4. Fold the body over the top hanger bar and under the second.
5. Here’s how it looks all ready to hang in the closet!


– via organizenvy.com

To get rid of stains or lingering odors on your wooden cutting board, place coarse salt over the board and rub it in using half a lemon. The coarse salt will get into all of the crevices and the lemon acts as a disinfectant. – via futurelad.com
Clean Your Coffee Maker With Vinegar or Lemon
1. Empty your coffee pot. Remove and throw away any used filters or coffee grounds. Then take a damp cloth to wipe the outside of the coffee pot.
2. Mix up your cleaner: combine equal parts of vinegar and water or lemon and vinegar.
3. Pour your cleaning solution into the reservoir. Fill the reservoir to the “fill line” with your DIY coffee maker cleaner. I have found that the easiest way to do this is to fill the carafe halfway with vinegar and the rest of the way with water.
4. Start a brew cycle. When the brew cycle is about halfway complete, turn off the coffee maker and let the cleaning solution sit in the machine for one hour.
5. Once an hour has passed, turn the coffee maker back on and finish the brew cycle.
6. Once the brew cycle finishes, discard the DIY cleaning mixture and fill the water reservoir with plain water. Run another brew cycle with only the water. Repeat this process again, allowing the machine to cool for a bit between brew cycles. It’s important to run the 2 extra cycles with plain water to make sure that your coffee doesn’t taste like vinegar.
7. Use hot, soapy water to thoroughly clean the carafe and filter basket. Let them dry. Then reassemble your coffee maker and enjoy fresh-tasting coffee! – via onecrazyhouse.com
How to Remove Musty Odors from Towels
1. Machine Wash With Vinegar. Run your towels through a regular cycle with very warm or hot water, your regular detergent, and 1/2 to 1 cup of vinegar as a natural fabric softener for the rinse cycle.
2. Machine Wash With Baking Soda. Run the towels through the regular cycle again, this time using only a half cup of baking soda and no detergent or fabric softener. Just the baking soda should do the trick.
3. Dry Your Towels. Once you have done the vinegar and baking soda treatment, you need to dry your towels. Many swear by the fact that line-dried items generally smell fresher, though they often do not feel as soft. One way to have the best of both worlds is to do both. Toss towels in the dryer with one or two new or very clean tennis balls or felted wool dryer balls. The balls will fluff up the towels and make them softer.
4. Hang Towels to Dry. Allow your towel to air-dry fully off the floor—dampness is the number one culprit of musty odors. – via thespruce.com

Here’s what you’ll need:
- Flat head screwdriver
- Rubber gloves
- Disinfectant of your choice
- Disinfectant wipes
- Paper towels and bleach water
- Disinfectant spray
Start by laying a towel, or a few paper towels, down on the ground, for 2 reasons: 1- to save your knees from hurting while you’re on the ground cleaning, and 2- to keep any unwanted yuck from the toilet, off the floor surface. Next, before doing any cleaning, make sure to flush the toilet. No one wants to hover over a dirty toilet bowl!
Under the tank, on the back ledge of the bowl, is kind of a tricky little place to get into! First try using an old toothbrush or a pipe cleaner. If you aren’t able to scrub all the gunk out, grab a plastic knife, wrap a disinfectant wipe around it, and slide it along.
If the toilet seat seems to be in your way (and you have an extra 10 minutes) take it off. This will not only give you more room, but it’s great for getting around, and underneath, the hinges of the seat, which are also hard to clean areas, but a place where germs and bacteria can hide out. If you don’t know how to take the seat off, no worries – read on!
1: Use your fingers to pull the plastic covers off the hinges.
2: Take your flat head and turn each screw counterclockwise until either the screw itself pulls out, or the the entire seat pulls up. On the underside, you can see there is a bolt. It may help to hold the bolt with one hand while unscrewing with your other.
3: Lift the seat off. You should be able to completely remove it now do a thorough deep cleaning of all that build-up!
To clean my rim, I use a disinfectant wipe, then I wrap a clean one around my flat head screwdriver, and stick it in the holes where the bolts were.
Removing the seat gave me the added room I needed to really get inside that small crevice under the tank. I also gave the seat and hinges a good rinsing in the sink, with soap and hot water, before screwing them back on!
Before putting the toilet seat back on, use a sponge and some toilet bowl cleaner, to give the rest of the toilet a thorough deep cleaning. I always prefer to use a sponge, instead of a toilet brush, because a sponge is more absorbent and is better for grabbing bacteria, and other unwanted yuck. Simply screw the lid back on when you’re finished cleaning! – via askannamoseley.com
Fill a cup with a tiny bit of apple cider vinegar, cover the top with tinfoil or plastic wrap and poke holes in the tinfoil using a fork. He also suggests placing a piece of sticky fly trap paper on top of the cup. Fruit flies are attracted to the scent of the apple cider vinegar and make their way inside the cup, or get stuck on the paper. In just a short amount of time, the flies will all be gone! – via homemaking.com

How And When To Clean Your Dishwasher Filter So Your Plates and Glasses Sparkle
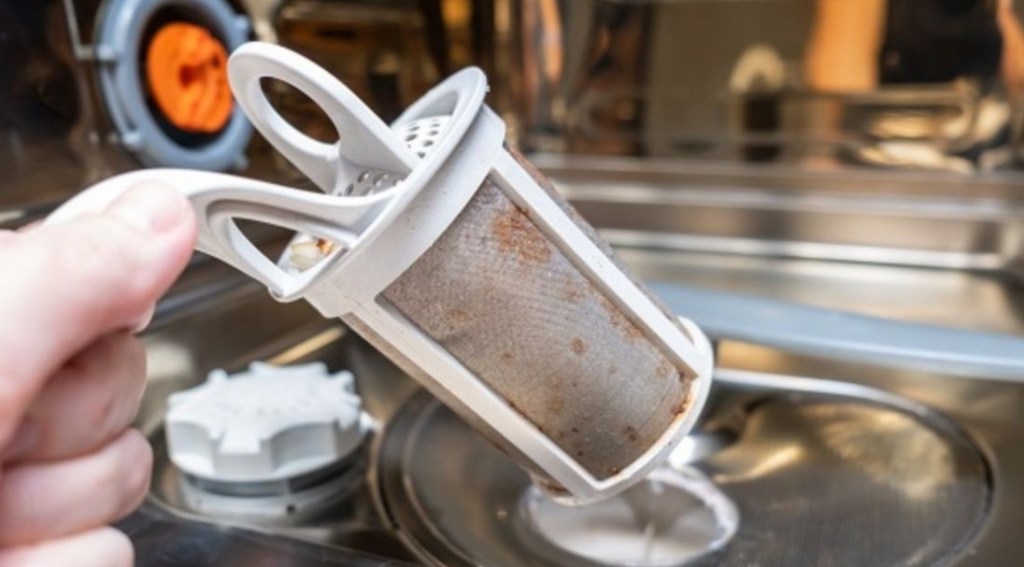
If your dishes don’t seem to be coming out of the dishwasher as clean as they once did, it’s probably time to check your dishwasher filter. I won’t lie – before learning this information, I didn’t even know where my dishwasher filter was located, let alone how to clean it. But cleaning your dishwasher filter is an important part of maintenance that should be performed regularly in order to keep your dishwasher in good working order.
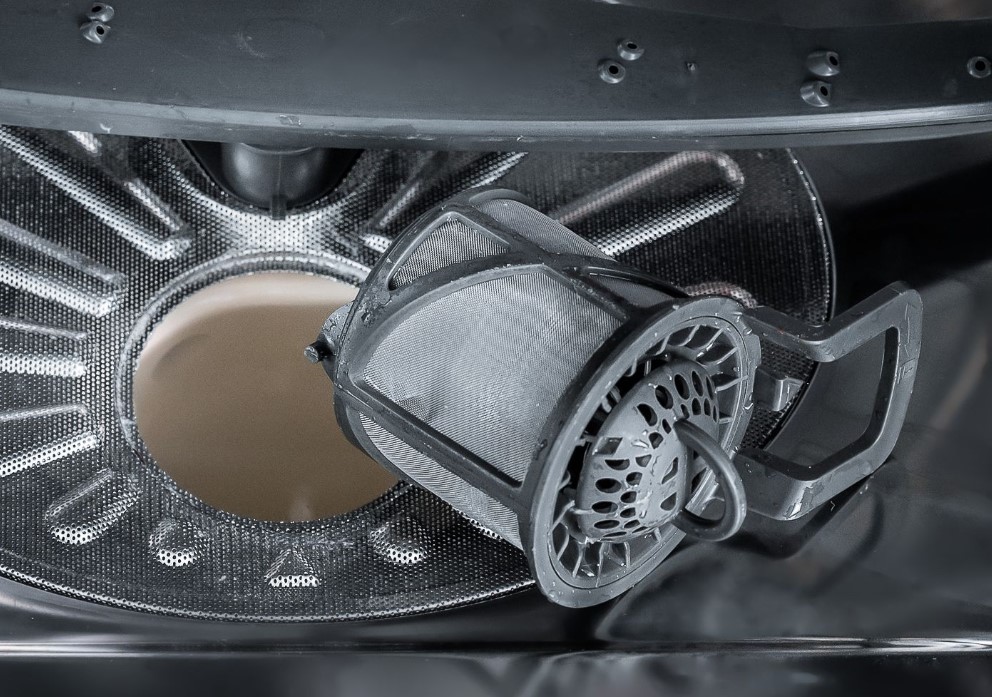
The purpose of the your dishwasher filter is to collect all of those little bits of food that come off of dishes during the wash cycle. The filter is generally located on the bottom of the dishwasher, either in the center or in one of the back corners. It’s usually a cone-like shape with a round top and mesh sides.

The purpose of the your dishwasher filter is to collect all of those little bits of food that come off of dishes during the wash cycle. The filter is generally located on the bottom of the dishwasher, either in the center or in one of the back corners. It’s usually a cone-like shape with a round top and mesh sides.
Once clean, you can put the filter back where you found it, twisting to ensure it locks into place. You should aim to check and clean your filter monthly to ensure your dishwasher can function as it’s meant to and that your dishes come out sparkling clean. – via homemaking.com

Declutter by taking photos of your kids’ artwork and either make photo collages through itsyart.com or design yourself through Walgreens or CVS.
How to Clean Your Washing Machine
- Fill the empty washer with hot water, as if you’re doing a large load of laundry.
- Add the quart of bleach, and let the full machine run for one minute to mix up the bleach with the water.
- Open the top of the machine and let it sit, all bleach-y and full, for an hour.
- At the end of the hour, shut the cover and let the machine run a complete cycle. (The water will drain out all the bleach, so it won’t have a chance to mix with the vinegar.)
- When it’s done, start again. This time, when you fill the washer with hot water, add the quart of white vinegar to the water and down the bleach channel.
- Let the machine run for a minute to agitate the water and vinegar. After that minute, open the top of the machine and again, let the hot water sit in the basin for an hour before you let the cycle complete.
- After cleaning the basin, spray the gaskets, dispensers and exterior of the machine with a solution of equal parts vinegar and water. Wipe everything down with a clean cloth. – via hgtv.com
How and Why You Should Clean Your Dryer Today
Dryer lint traps loaded with build-up can be a huge fire hazard; stay safe by making a habit of cleaning the inside of your dryer. Plus, a clean dryer will run more efficiently, thus saving money on utility bills.
1. Keep a Clean Lint Trap. Removing lint that’s captured in the mesh screen of your lint trap is critical to preventing fires because a dust-free trap allows for better airflow. When cleaning your dryer, it’s also a good practice to remove the lint trap and vacuum the area with a crevice attachment to keep dust and debris that evaded the trap at bay. If you use dryer sheets and fabric softeners, there’s an increased likelihood of residue buildup on the mesh lint trap. Be wary of this buildup, and proactively use an old toothbrush dipped in warm, soapy water to clean the mesh. Allow the trap to dry completely before putting it back into the machine. In addition to reducing the risk of fire, a clean lint trap helps airflow which directly improves the speed at which your dryer can do its job. And when you shorten the running time of the appliance, you’ll also reduce your overall energy bill.
2. Wipe Down the Dryer Drum. Residue from dryer sheets and fabric softener not only clog your lint trap but can add a film to the inside of your machine. Once a month, use a spray of 1/2 white vinegar and 1/2 water to mist the inside of the drum. Wipe it down with a microfiber cloth, and leave the dryer door open so it can air dry. – via hgtv.com
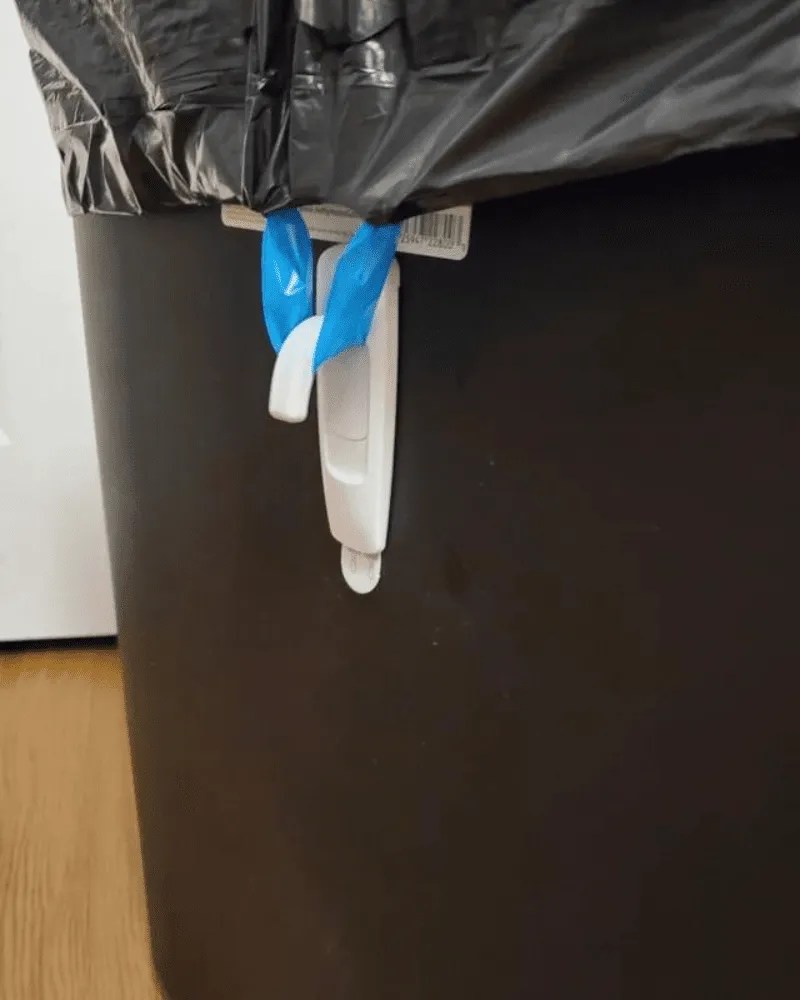
Trash bag hack: Get some of those super cheap command hooks from your local store, then glue them to two sides of your trash can. This way, you can easily hook your garbage bag to the bin, so there are no more slipping bags. – via futurelad.com
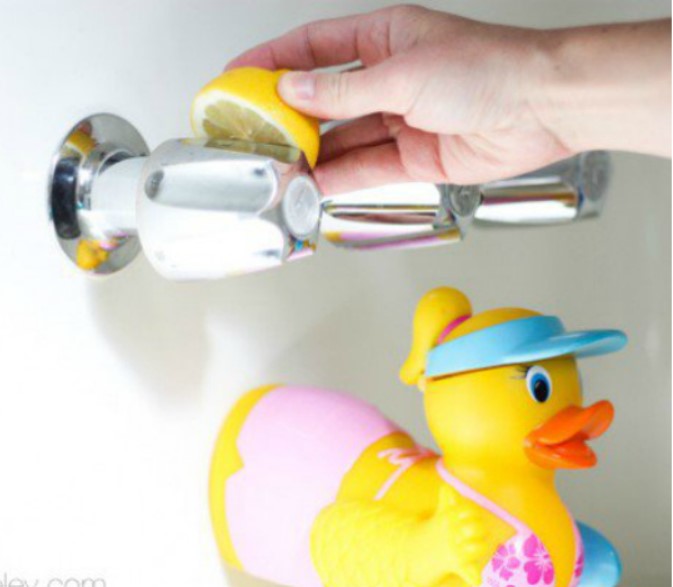
Get rid of water spots on your chrome fixtures with lemon. Just rub it over the chrome and those spots will disappear! – via onecrazyhouse.com
How to Properly Clean Pillows
In the case of down, down alternative and polyester fills, you can wash them in the washing machine — unless the label says otherwise. If your pillow still has a care label, follow the instructions on it. But since most of us tear those labels off before the pillows hit the bed, here’s a recipe for washing pillows in the washer.
- Remove pillowcases and pillow covers.
2. Pretreat stains with an enzyme-based laundry stain remover. Let sit at least 10 minutes before washing.
3. Wash in the machine on the delicate or gentle cycle using a tablespoon or less of detergent — too much soap will cause lots of suds, which are difficult to rinse completely. Wash in warm water. If you have bad allergies, wash in hot water, though you may have to replace your pillows more often since the heat breaks down the pillow over time.
Pro tip: If you have a top-load machine with an agitator, place the pillows in vertically. Always wash two pillows at a time to keep the load balanced — and stick to two so water has room to circulate. If you’re only washing one pillow, balance it by washing a couple of heavy towels with it.
4. The quickest, easiest way to dry pillows is in the dryer. But heat can break down the fill, so dry on the air-only cycle for 20 minutes at a time until the pillows are dry. Use a couple of clean tennis balls or dryer balls to speed up the process and dry the fill evenly. You can also hang pillows over the tub or on a clothesline outdoors. Make sure they’re completely dry before using them; otherwise, they’ll mildew. – via hgtv.com

To get rid of rust stains on pots and pans, cut a lemon in half, then sprinkle baking soda on the stain. Next, take one half of the lemon, squeeze some juice on it and scrub with the lemon. – via https://www.facebook.com/profile.php?id=61557690450916&sk=reels_tab
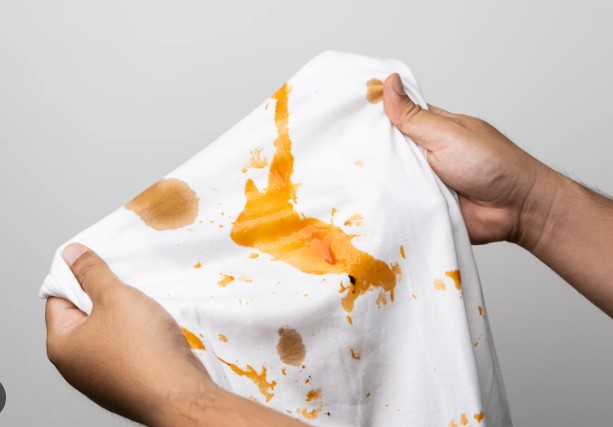
Ultimate stain remover: Mix 1 tsp. Dawn dishwashing detergent, 3-4 tbsp. of hydrogen peroxide, 2 tbsp. of baking soda. Scrub with a scrubbing brush. – via https://www.facebook.com/helthylifestyle24